티스토리 뷰
Reference
- 인프런 김영한 <스프링 MVC 1편 - 백엔드 웹 개발 핵심 기술>
프로젝트 세팅
Gradle - groovy 프로젝트,
Dependencies
- Lombok
- Spring Web
Jar 대신에 War 사용 -> JSP 사용해야 하기 때문에.
Postman 사용 - 설치
코드 및 부연 설명
ServletApplication
@ServletComponentScan //서블릿 자동 등록
@SpringBootApplication
public class ServletApplication {
	public static void main(String[] args) {
		SpringApplication.run(ServletApplication.class, args);
	}
}
- 내 패키지 포함 하위 패키지 전부 뒤져서 서블릿을 다 찾아낸 다음 등록해서 사용할 수 있도록 도와준다.
서블릿 등록하기
HelloServlet
- HttpServlet은 HTTP 요청을 처리하기 위한 기본 클래스
@WebServlet(name = "helloServlet", urlPatterns = "/hello") // "/hello"로 url이 오면 이게 실행된다.
public class HelloServlet extends HttpServlet { // 이 서블릿이 호출되면 서비스 메서드가 호출된다.

  @Override
  protected void service(HttpServletRequest request, HttpServletResponse response)
  	throws ServletException, IOException {

    System.out.println("HelloServlet.service"); //현재 서비스 메서드에서 처리 중인 요청과 응답에 관한 정보출력
    System.out.println("request = " + request);
    System.out.println("response = " + response);

    // HTTP 요청에서 "username" 매개변수 값을 추출. 클라이언트가 요청 시 "username" 매개변수를 전달해야 한다.
    String username = request.getParameter("username");
    System.out.println("username = " + username);

    response.setContentType("text/plane"); // 응답의 컨텐츠 유형을 설정
    response.setCharacterEncoding("utf-8");
    response.getWriter().write("hello " + username);
    // 응답을 생성하고 클라이언트에게 "hello [사용자이름]" 메시지를 보냄
  }
}
- 목적은 클라이언트로부터 HTTP GET 또는 POST 요청을 받으면 해당 요청을 처리하고 "Hello [사용자이름]"을 응답으로 보내는 것
1) @WebServlet 어노테이션
: 이 어노테이션은 서블릿 컨테이너(예: Apache Tomcat)에게 이 클래스가 서블릿으로 사용됨을 알려줌
- name 속성은 서블릿의 이름을 지정하고, urlPatterns 속성은 이 서블릿이 어떤 URL 패턴에 응답할 것인지 지정.
- 여기서는 "/hello" 패턴에 응답한다.
2) @Override는 ctrl + O 해서 자물쇠 걸려있는 service() 메서드
- service 메서드는 모든 HTTP 요청에 대한 진입점. 이 메서드는 클라이언트의 요청을 처리하고 응답을 생성.
- HttpServletRequest 객체는 클라이언트의 HTTP 요청을 나타내며, HttpServletResponse 객체는 서블릿이 생성한 응답.
요약하면, 이 서블릿은 "/hello" URL에 대한 HTTP 요청을 처리하며, 클라이언트가 "username" 매개변수를 제공하면 그 값을 포함한 "hello [사용자이름]" 메시지를 응답으로 반환한다.
서블릿은 클라이언트와 웹 애플리케이션 간의 상호작용을 처리하기 위한 역할을 다.

HTTP 요청 메시지 로그로 확인하기
application.properties
logging.level.org.apache.coyote.http11=debug
이렇게 하고 실행하면
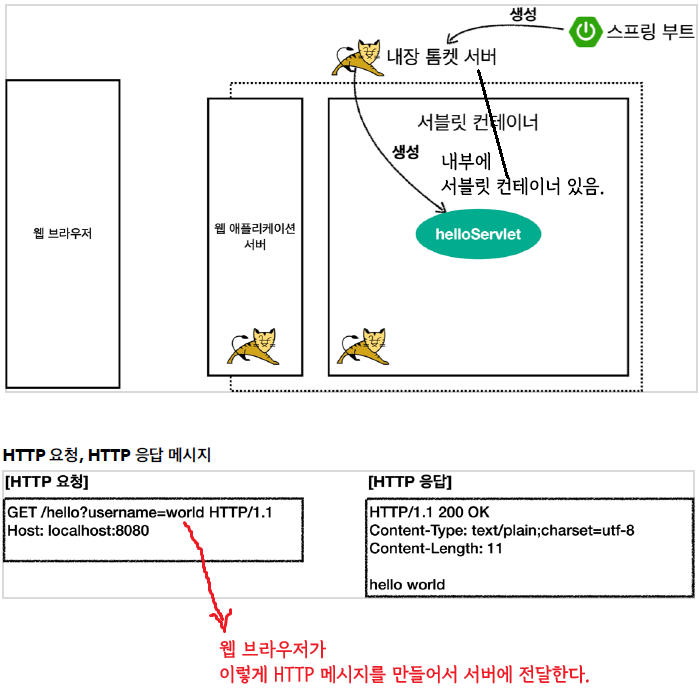
..o.a.coyote.http11.Http11InputBuffer: Received [GET /hello?username=servlet
HTTP/1.1
Host: localhost:8080
Connection: keep-alive
Cache-Control: max-age=0
sec-ch-ua: "Chromium";v="88", "Google Chrome";v="88", ";Not A Brand";v="99"
sec-ch-ua-mobile: ?0
Upgrade-Insecure-Requests: 1
User-Agent: Mozilla/5.0 (Macintosh; Intel Mac OS X 11_2_1) AppleWebKit/537.36
(KHTML, like Gecko) Chrome/88.0.4324.150 Safari/537.36
Accept: text/html,application/xhtml+xml,application/xml;q=0.9,image/avif,image/
webp,image/apng,*/*;q=0.8,application/signed-exchange;v=b3;q=0.9
Sec-Fetch-Site: same-origin
Sec-Fetch-Mode: navigate
Sec-Fetch-User: ?1
Sec-Fetch-Dest: document
Referer: http://localhost:8080/basic.html
Accept-Encoding: gzip, deflate, br
Accept-Language: ko,en-US;q=0.9,en;q=0.8,ko-KR;q=0.7
]
메시지가 다 나옴을 확인할 수 있다.
서블릿 컨테이너 동작 방식
내장 톰캣 서버 생성

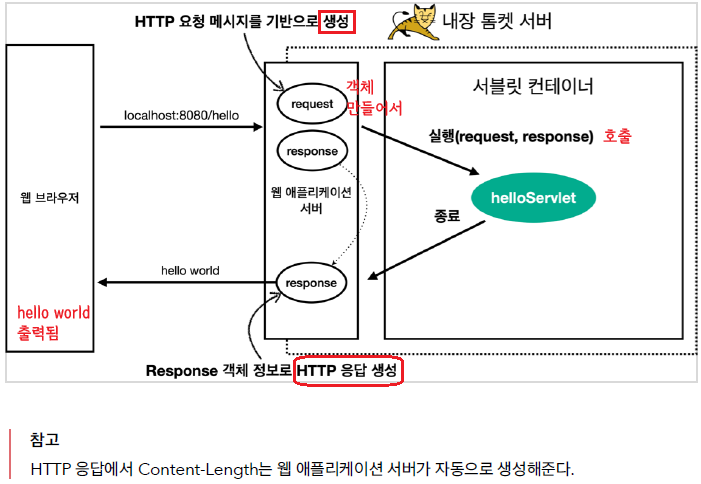
웹 에플리케이션 서버의 요청-응답 구조

Welcome 페이지 추가
지금부터 개발할 내용을 편리하게 참고할 수 있도록 welcome 페이지를 만들어두자.
webapp 경로에 index.html 을 두면 http://localhost:8080 호출시 index.html 페이지가 열린다.
main/webapp/index.html
<!DOCTYPE html>
<html>
<head>
<meta charset="UTF-8">
<title>Title</title>
</head>
<body>
<ul>
<li><a href="basic.html">서블릿 basic</a></li>
</ul>
</body>
</html>
main/webapp/basic.html
<!DOCTYPE html>
<html>
<head>
<meta charset="UTF-8">
<title>Title</title>
</head>
<body>
<ul>
<li>hello 서블릿
<ul>
<li><a href="/hello?username=servlet">hello 서블릿 호출</a></li>
</ul>
</li>
<li>HttpServletRequest
<ul>
<li><a href="/request-header">기본 사용법, Header 조회</a></li>
<li>HTTP 요청 메시지 바디 조회
<ul>
<li><a href="/request-param?username=hello&age=20">GET -
쿼리 파라미터</a></li>
<li><a href="/basic/hello-form.html">POST - HTML Form</a></
li>
<li>HTTP API - MessageBody -> Postman 테스트</li>
</ul>
</li>
</ul>
</li>
<li>HttpServletResponse
<ul>
<li><a href="/response-header">기본 사용법, Header 조회</a></li>
<li>HTTP 응답 메시지 바디 조회
<ul>
<li><a href="/response-html">HTML 응답</a></li>
<li><a href="/response-json">HTTP API JSON 응답</a></li>
</ul>
</li>
</ul>
</li>
</ul>
</body>
</html>
실행 결과를 보면

이러한 형태의 페이지 완성.
'[개발] - Spring > MVC 1' 카테고리의 다른 글
| HTTP 요청 데이터 - 개요, GET 쿼리 파라미터 (0) | 2023.09.19 |
|---|---|
| HttpServletRequest 기본 사용법 (0) | 2023.09.19 |
| HTML, HTTP API, CSR, SSR (0) | 2023.09.06 |
| 동시 요청 - 멀티 쓰레드 (0) | 2023.09.05 |
| 서블릿 (0) | 2023.09.05 |


