티스토리 뷰
입력 폼 처리
지금부터 타임리프가 제공하는 입력 폼 기능을 적용해서 기존 프로젝트의 폼 코드를
타임리프가 지원하는 기능을 사용해서 효율적으로 개선해 나간다.
먼저, 미리 핵심요약
1.

2.

등록 폼
- th:object 를 적용하려면 먼저 해당 오브젝트 정보를 넘겨주어야 한다.
- 등록 폼이기 때문에 데이터가 비어있는 빈 오브젝트를 만들어서 뷰에 전달한다.
FormItemController 변경
@GetMapping("/add")
public String addForm(Model model) {
	model.addAttribute("item", new Item());
	return "form/addForm";
}
form/addForm.html 변경 부분
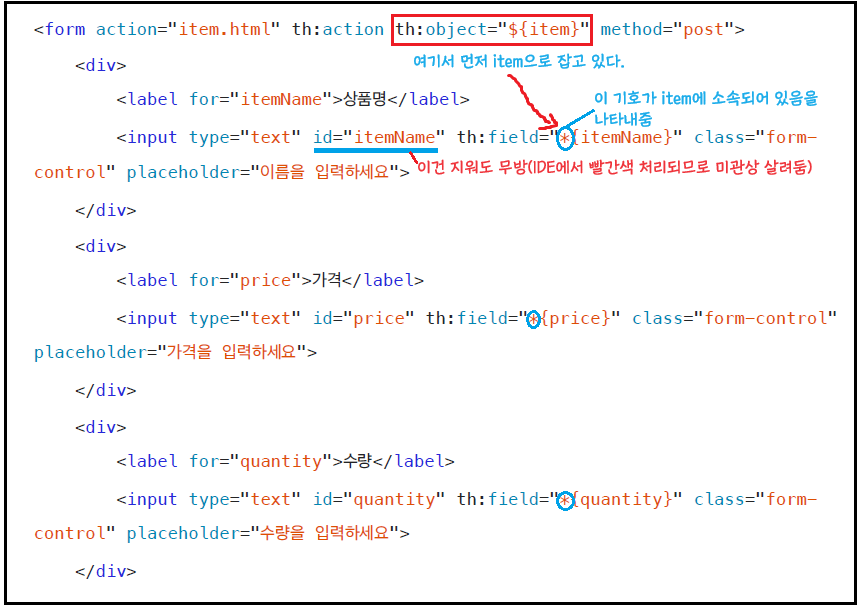
그림으로 먼저 설명

addForm.html(전체)
<!DOCTYPE HTML>
<html xmlns:th="http://www.thymeleaf.org">
<head>
    <meta charset="utf-8">
    <!-- 부트스트랩 CSS 파일을 불러옵니다. -->
    <link th:href="@{/css/bootstrap.min.css}" href="../css/bootstrap.min.css" rel="stylesheet">
    <style>
        /* 스타일 정의: .container 클래스에 최대 너비를 설정합니다. */
        .container {
            max-width: 560px;
        }
    </style>
</head>
<body>

<div class="container">

    <div class="py-5 text-center">
        <!-- 페이지 제목을 출력합니다. -->
        <h2>상품 등록 폼</h2>
    </div>

    <form action="item.html" th:action th:object="${item}" method="post">
        <div>
            <!-- 상품명 입력 필드와 레이블 -->
            <label for="itemName">상품명</label>
            <input type="text" id="itemName" name="itemName" th:field="*{itemName}" class="form-control" placeholder="이름을 입력하세요">
        </div>
        <div>
            <!-- 가격 입력 필드와 레이블 -->
            <label for="price">가격</label>
            <input type="text" id="price" name="price" th:field="*{price}" class="form-control" placeholder="가격을 입력하세요">
        </div>
        <div>
            <!-- 수량 입력 필드와 레이블 -->
            <label for="quantity">수량</label>
            <input type="text" id="quantity" name="quantity" th:field="*{quantity}" class="form-control" placeholder="수량을 입력하세요">
        </div>

        <hr class="my-4">

        <div class="row">
            <div class="col">
                <!-- 상품 등록 버튼 -->
                <button class="w-100 btn btn-primary btn-lg" type="submit">상품 등록</button>
            </div>
            <div class="col">
                <!-- 취소 버튼: 버튼 클릭 시 'items.html' 페이지로 이동합니다. -->
                <button class="w-100 btn btn-secondary btn-lg"
                        onclick="location.href='items.html'"
                        th:onclick="|location.href='@{/form/items}'|"
                        type="button">취소</button>
            </div>
        </div>

    </form>

</div> <!-- /container -->
</body>
</html>
부연 설명

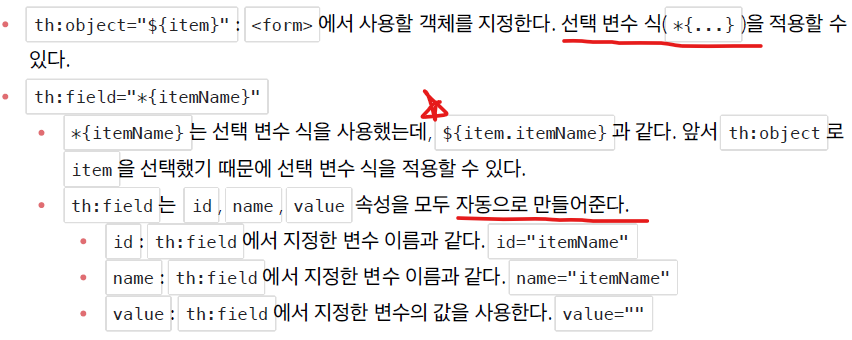
그래서

수정 폼
컨트롤러는 그대로 유지
@GetMapping("/{itemId}/edit")
public String editForm(@PathVariable Long itemId, Model model) {
	Item item = itemRepository.findById(itemId);
	model.addAttribute("item", item);
	return "form/editForm";
}
원래 html 코드
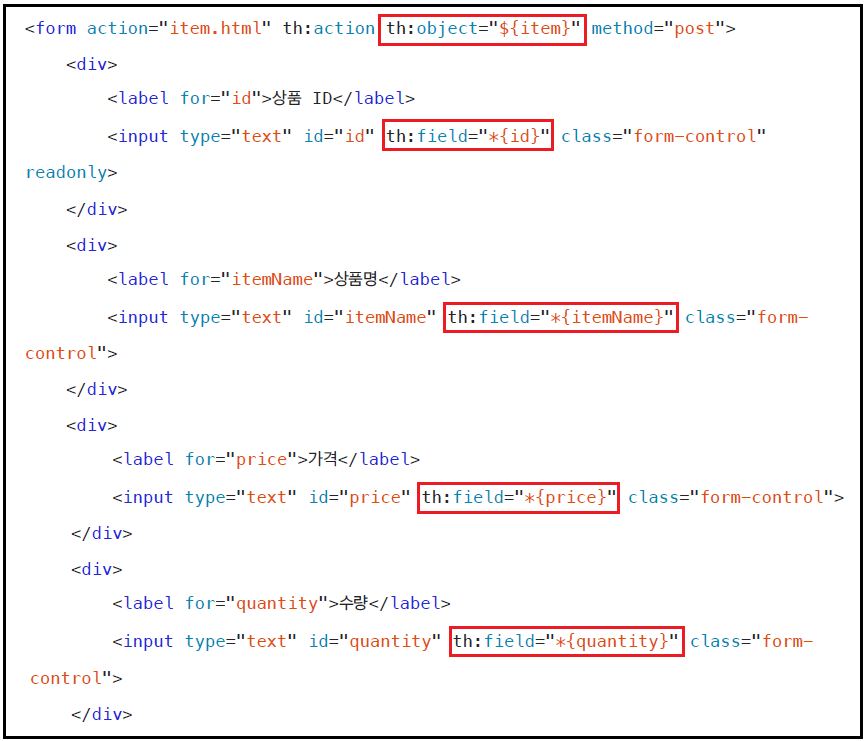
editForm.html(변경 전)

바꿀 부분

전체 코드
editForm.html
<!DOCTYPE HTML>
<html xmlns:th="http://www.thymeleaf.org">
<head>
    <meta charset="utf-8">
    <!-- 부트스트랩 CSS 파일을 불러옵니다. -->
    <link th:href="@{/css/bootstrap.min.css}" href="../css/bootstrap.min.css" rel="stylesheet">
    <style>
        /* 스타일 정의: .container 클래스에 최대 너비를 설정합니다. */
        .container {
            max-width: 560px;
        }
    </style>
</head>
<body>

<div class="container">

    <div class="py-5 text-center">
        <!-- 페이지 제목을 출력합니다. -->
        <h2>상품 수정 폼</h2>
    </div>

    <form action="item.html" th:action th:object="${item}" method="post">
        <div>
            <!-- 상품 ID 입력 필드와 레이블: 수정 불가능한 필드로 item.id 값을 출력합니다. -->
            <label for="id">상품 ID</label>
            <input type="text" id="id" name="id" th:field="*{price}" class="form-control">
        </div>
        <div>
            <!-- 상품명 입력 필드와 레이블: 현재 상품명을 출력하고 수정 가능합니다. -->
            <label for="itemName">상품명</label>
            <input type="text" id="itemName" name="itemName" th:field="*{itemName}" class="form-control">
        </div>
        <div>
            <!-- 가격 입력 필드와 레이블: 현재 가격을 출력하고 수정 가능합니다. -->
            <label for="price">가격</label>
            <input type="text" id="price" name="price" th:field="*{price}" class="form-control">
        </div>
        <div>
            <!-- 수량 입력 필드와 레이블: 현재 수량을 출력하고 수정 가능합니다. -->
            <label for="quantity">수량</label>
            <input type="text" id="quantity" name="quantity" th:field="*{quantity}" class="form-control" >
        </div>

        <hr class="my-4">

        <div class="row">
            <div class="col">
                <!-- 저장 버튼: 수정 내용을 저장하는 버튼 -->
                <button class="w-100 btn btn-primary btn-lg" type="submit">저장</button>
            </div>
            <div class="col">
                <!-- 취소 버튼: 버튼 클릭 시 이전 페이지로 돌아가는 버튼 -->
                <button class="w-100 btn btn-secondary btn-lg"
                        onclick="location.href='item.html'"
                        th:onclick="|location.href='@{/form/items/{itemId}(itemId=${item.id})}'|"
                        type="button">취소</button>
            </div>
        </div>

    </form>

</div> <!-- /container -->
</body>
</html>

정리
th:object , th:field 덕분에 폼을 개발할 때 약간의 편리함이 가미되었다.
사실 이것의 진짜 위력은 뒤에 설명할 검증(Validation)에서 나타난다.
이후 검증 부분에서 폼 처리와 관련된 부분을 더 깊이있게 다룰 예정.
728x90
반응형
'[개발] - Spring > Thymeleaf' 카테고리의 다른 글
| Thymeleaf 통합 (2) 체크 박스 - 단일(1) (0) | 2023.12.02 |
|---|---|
| 요구사항 (또) 추가 (1) | 2023.11.30 |
| 통합을 위한 작업 - 프로젝트 구조 (2) | 2023.11.27 |
| 타임리프 스프링 통합 (2) | 2023.11.26 |
| Thymeleaf (15) 템플릿 레이아웃 02 (0) | 2023.11.24 |
Comments


